Quantcast
Channel: Firearms History, Technology & Development
Viewing all 263 articles
Browse latest View live

Pocket Rifles

$
0
0
In today's post, we will study a particular class of firearm that was very uniquely American and popular from the end of the Civil War to the beginning of World War I. We are going to study about Pocket Rifles, otherwise called Bicycle Rifles.

The origin on these weapons has to do with the Stevens Arms and Tools Company, founded by Joshua Stevens. He was a well-respected toolmaker, who had worked for Colt, Eli Whitney, Smith & Wesson, Allen and many other American gunmakers of the era, before founding his own firearms company in 1864. The company's first two models were a Pocket Pistol and a Vest Pocket Pistol (a year ahead of Remington's Vest Pocket Pistol model). In 1869, the company produced what it called a "Pocket Rifle". This was largely based on their Pocket Pistol model, except that it had a longer barrel, better sights and a cap on the pistol's grip to accept a detachable shoulder stock made of wire. Like the Pocket Pistol, the Pocket Rifle was also a single shot model.

In 1872, a larger 'New Model Pocket Rifle' was added to handle cartridges up to .32 caliber rimfire cartridge. Shortly after that, a line called the 'Hunters Pet Pocket Rifle' was also introduced that went up to .44 caliber. The shoulder stock was also modified so that it slid into a dovetail cut into the butt of the pistol and a screw on the backstrap.

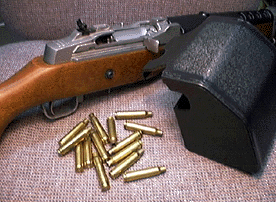
Public domain image of Stevens Pocket Rifles

Click on the image to enlarge. Public domain image.

The New Model Pocket Rifle (First Issue) was the same basic design as the Old Model Pocket Rifle, but was larger and had a heavier barrel to handle the bigger .32 caliber rimfire cartridge. It became far more popular than the old model and outsold it by a wide margin. It was only manufactured for three years though, between 1872-1875, after which it was replaced by the New Model Pocket Rifle (Second Issue) model, which was sold from 1875-1896

The second issue model mounted the firing pin in the frame rather than the hammer, as a safety feature. In 1887, a version that fired the .22 Long Rifle (also known as .22 LR) rimfire cartridge was manufactured for the first time. The .22 LR cartridge was also invented by the Stevens Arms and Tools Company and is still the most popular cartridge in the world today (almost every major firearm manufacturer in the world has made at least one product that fires .22 LR). 

When separated into two pieces (the pocket rifle and the stock), each piece measured between 18 to 24 inches (46-61cm.), which meant they could be stowed in a long coat pocket. Weight of the larger caliber models was around 5 to 5.75 lbs. (2.2 - 2.6 kg.) and the lighter models up to .32 caliber only weighed about 2 - 2.75 lbs. (0.9-1.25 kg.) The barrels were offered in a variety of lengths: 10 inches, 12 inches, 15 inches or 18 inches (25 cm., 30 cm., 38 cm. or 46 cm.)

In the 1880s, advertisements for these guns started to refer to them as "Bicycle Rifles", probably as a marketing tactic to sell them to cyclists of that era, as a light rifle that could be carried for self defense.

An advertisement for a Stevens Bicycle Rifle. Click on the image to enlarge.

They were also offered with carrying cases made of leather or canvas and marketed to hunters as a secondary light rifle, and to fishermen to carry with their fishing equipment.

The nice thing about these compact rifles was that they offered much more range and accuracy than pistols, but were much cheaper than other single shot rifles of that era, while also being much more portable than other rifle models. One Mr. A.C. Gould reported that using a model firing .22 caliber cartridges with an 18 inch barrel, ten shots were placed into a target of 8 inches diameter at 200 yards distance.

After the success of the initial models, other manufacturers also started to make pocket rifles, but Stevens continued to dominate the market until the last model was manufactured during World War I. It must be noted that practically all dealer catalogs of that period that advertised pocket rifles. invariably showed the Stevens brand name. Some larger dealers offered pocket rifles under their own brand, but many of these were actually manufactured by Stevens and marked with the dealer's brand name.

While pocket rifles sold very well in America, they remained a very American invention and never really spread to other countries. While they were light and relatively portable, they were all single-shot models. Their popularity began to decline after semi-automatic and fully-automatic weapons became more common.


Differences Between the VZ-58 and the AK

$
0
0
First, I'd like to wish all the readers of this blog a very happy 2015.

Quick, identify the firearm in the image below:

Click on the image to enlarge. Public domain image.

If you said something along the lines of "AK-47" or "AKM", then you're wrong. What you're looking at is the Czechoslovakian vz. 58 rifle. The vz. 58 does resemble an AK-47 or an AKM externally, but there are a lot of differences underneath the hood. We will study more about this rifle in this post.

The name "vz. 58" is actually a contraction of "vzor 58' (i,e. "model 58"). The official full name of this weapon is "7,62 mm samopal vzor 58" (i.e. 7.62 mm. automatic firearm model 58"). The number 58 is because this weapon entered service in the year 1958 (the AK-47 is named similarly -- it first entered service in 1947).

After World War II, the Soviet Union started using the 7.62x39 mm. cartridge for its AK-47 and AKM rifles and insisted that all the Warsaw Pact countries use the same cartridge for standardization. Many of the Warsaw pact countries (Poland, Hungary, Romania etc.) also adopted the AK-47 for their own soldiers, but the Czechoslovakians decided to only adopt the cartridge, but use their own rifle technologies. They already had a history of developing firearms in the past, and the city of Brno was most recently known for developing the precursor to the famous Bren gun of World War II. A designer named Jiri Cermak was assigned to develop the new rifle in Brno in 1956 and the new rifle entered service in 1958.

The new rifle was chambered to use the 7.62x39 mm. cartridge, the same as the AK-47. This is about where the similarity between the two ends. What are some of the major differences?

  • Action: The AK-47 (and AKM and the rest of the AK family) uses the long stroke piston system, whereas the vz. 58 uses the short stroke piston system. In the short-stroke system, the piston moves for a very short distance (in the case of a vz. 58, it moves 19 mm. (or about 0.74 inches)), whereupon it is stopped by a projection. The short backward movement of the piston imparts a sharp blow to the bolt-carrier, which separates from the piston and then continues backwards due to momentum. In a long stroke system, the piston and the bolt carrier move backward together. This means that the short stroke piston system has a smaller mass of moving parts, since the bolt-carrier weighs less than the combined bolt-carrier and piston together. Therefore, there is less vibration due to the moving parts and the vz. 58 is easier to keep pointed to the target.
  • Firing mechanism: The AK-47 uses a traditional rotating hammer mechanism, whereas the vz. 58 has is striker fired.
  • Safety/Fire selector lever: The AK-47 family is famous for its clunky large fire selector lever, which is located on the right side of the weapon and is cumbersome to operate. The user needs to take the firing hand off the pistol grip to manipulate an AK fire selector lever. The vz. 58 has a much more ergonomic selector mechanism and the lever can be manipulated without taking the hand off the pistol grip.
  • Magazine: The AK-47, AKM and vz. 58 all come with 30 round box magazines, however, the vz. 58 magazine is shaped a bit  differently, so it cannot be inserted into an AK and vice-versa. The vz. 58 magazine is also made of a lightweight aluminium alloy and therefore, it is lighter than the steel magazines of the AK family. The vz. 58 magazine can also be loaded via stripper clips, without removing the magazine from the rifle.
  • Receiver: The early AK-47 receivers were made of milled steel, until the Soviets mastered the art of producing stamped steel parts from the Germans and the AKM (and all subsequent AK models) all have stamped steel parts. This was done to improve the production rate. The vz. 58 still uses a milled steel receiver. While it takes longer to make a milled steel receiver, it is more rigid and therefore has a bit more accuracy.
  • Lock action: The vz. 58 has a tilting lock action with a falling breechblock (similar to Beretta 92)
  • Bolt hold-open feature: When the last round has been fired in a vz. 58, the bolt catch locks the bolt carrier to the rear of the gun and it stays open, which alerts the user that the firearm is out of ammunition. In an AK, the majority of the magazines allow the bolt to go forward on an empty magazine, therefore, the user cannot easily tell that the rifle is empty.
  • Stock: The early vz. 58s were made using beech wood stocks, but they soon switched to using a wood-impregnated plastic stock. If you click on the image of the rifle above to enlarge it, you'll notice that the stock has a somewhat grainy look to it. These stocks are affectionately known as "beaver barf" to collectors and are light, durable and economical. AK rifles use laminated wood stocks (though later models use plastic), which are also durable and cheap to produce, but they are a bit heavier. Later stocks on vz. 58 were made of steel and alloys and designed to be foldable or collapsible. One more difference is that the stock on a vz. 58 is designed to be modular and easily detachable/interchangeable.
  • Dust Cover: The receiver on a vz. 58 has no ejection port dust cover, because the receiver is completely enclosed by the bolt carrier. Therefore, the ejection port is huge compared to an AK. This can be easily seen when the rifle is being operated. 
  • Disassembly: The vz. 58 is held by two pins and is designed to be disassembled without using any tools.
Even though the AK family and the vz, 58 look very similar externally, the vz. 58 cannot exchange parts with the AK family because of the vast differences in the mechanisms.

The following video makes the differences between the two very clear.


The vz.58 was manufactured between 1958 and 1984 and around one million rifles were manufactured, which means they are not as widespread as the AK family. They still remain in use with Czech and Slovak military forces, and they were exported to some other countries as well (Cuba, Vietnam, India, Indonesia, Ethiopia, Uganda etc.)

Are Rifle Calibers Getting Smaller?

$
0
0
In the last 50 years or so, there have been several arguments about the 5.56x45 mm. cartridge and its small bullet. Some argue that the larger bore 7.62x51 mm. cartridge is harder hitting and therefore better. Others argue that the 5.56x45 mm. cartridge is lighter, but hits adequately, therefore a person can carry more of them. This caliber debate has been going on for a while. Bear in mind that in the early 1950s, when the 7.62x51 mm. cartridge was first introduced, several people from that era thought that *it* was a smaller cartridge! This is because it replaced the larger .30-06 cartridge which was in service since about 1906. As we will soon see, the decrease in size of cartridge calibers has actually been going on for a lot longer.

In the early part of the 19th century, soldiers mounted on horses (cavalry) were still an important part of many armies. We hear accounts of several famous cavalry battles, such as the Charge of the Light Brigade (and the lesser known Charge of the Heavy Brigade at the same battle),  Pickett's charge, Battle of Little Bighorn etc. It was the opinion of military experts of that period, that the bore of an infantry musket must be large and the bullet heavy enough, to stop a charging cavalry soldier. It was believed at that time that a smaller bullet, even with greater velocity and equal momentum  compared to a larger bullet, would only wound the foe, but not instantly disable him. However, it was later found by experiment, that the increase in velocity of a bullet makes up for what it loses in mass, and a lighter bullet has greater range and a soldier can carry more of them, which makes the infantry man much more effective in the field. Therefore, since about 1850, as firearm technology gradually started moving towards rifles, the size of bullets have been decreasing with every advance in infantry weapon technology. The following table is largely transcribed from The Gun and its Development by W.W. Greener and lists the diameters of bullets from various military forces in Europe and America from 1850.

YearCountryFirearmCaliber
1850EnglandBrown Bess (11 bore).750 inch (19.2 mm.)
1850EnglandBrown Bess (14 bore).693 inch (17.85 mm.)
1852EnglandEnfield.577 inch (14.8 mm.)
1854Austria28-bore rifle.550 inch (13.8 mm.)
1860Sweden40-bore rifle.488 inch (12.6 mm.)
1866France59-bore rifle.433 inch (11.0 mm.)
1867Austria62-bore rifle.420 inch (10.7 mm.)
1869Switzerland75-bore rifle.400 inch (10.4 mm.)
1871Germany, Spain and Holland58-bore rifle.433 inch (11.0 mm.)
1871England51-bore rifle.450 inch (11.43 mm.)
1874France58-bore rifle.433 inch (11.0 mm.)
1878Sweden76-bore rifle.396 inch (10.15 mm.)
1880Serbia76-bore rifle.396 inch (10.15 mm.)
1886France and Portugal150-bore rifle.315 inch (8.0 mm.)
1887Turkey.350 inch (9.5 mm.)
1887EnglandEnfield Martini.400 inch (10.25 mm.)
1888Germany156-bore rifle.311 inch (7.9 mm.)
1888Germany150-bore rifle.315 inch (8.0 mm.)
1889England172-bore rifle.303 inch (7.7 mm.)
1889Belgium173-bore rifle.303 inch (7.65 mm.)
1889Denmark150-bore rifle.315 inch (8.0 mm.)
1891Switzerland.295 inch (7.5 mm.)
1891Italy.256 inch (6.5 mm.)
1891Russia.300 inch (7.62 mm.)
1892Spain.276 inch (7.0 mm.)
1892Holland and Romania.256 inch (6.5 mm.)
1893USA.300 inch (7.62 mm.)
1895USA (US Navy only).236 inch (5.87 mm.)

As can be seen in the table, the diameter and size of the bullets has been decreasing for quite a while. As propellants improved and black-powder began to be replaced by more powerful smokeless powders, the sizes and weights of the bullets began to decrease as well.

All About Scopes - I

$
0
0
Many months ago, we had studied about rifle scopes briefly, when studying different types of sights. In today's post, we will cover the subject in a bit more detail.

There are two types of telescopes available to shooters:
  1. Fixed Power Scope - These are simpler and have a fixed magnification factor.
  2. Variable Power Scope - These are more complicated and allow the user to adjust the magnification, according to the distance that the target is from the rifle.
To understand more about these two types, let us first look at the main parts of a scope:

A scope made by Nikon.

  1. Eyepiece
  2. Ocular Lens
  3. Exit Pupil
  4. Power Ring
  5. Windage Adjustment Control
  6. Elevation Adjustment Control
  7. Objective Lens
  8. Eye Bell
  9. Objective Bell
  10. Parallax Compensation Control
In the above image, 1 is the eyepiece, which is the end of the scope that the user looks through. The eyepiece encloses a smaller lens, called the ocular lens (2), through which the user views the target. The eye piece generally has a focusing control at the end the sight to obtain a sharp image of the target and the reticle.

The exit pupil (3) is the size of the column of light that comes through the eyepiece: the larger the exit pupil is, the brighter the image. The exit pupil size is defined as the diameter of the objective lens divided by the magnification power of the scope. So, if the diameter of the objective lens is (say) 40 mm. and the scope has 4x magnification, then the exit pupil is 10 mm. For variable power scopes, the magnification can be changed, for instance, from 4x to 10x. This means that, assuming you have the same 40 mm. diameter objective lens as above, the exit pupil will vary from 10 mm. to 4 mm. (i.e.) if you increase the magnification, it will decrease the exit pupil size and vice versa. A smaller exit pupil means the image will appear dimmer and a larger exit pupil means the image will appear brighter. 

The power ring (4) is a feature that is only found on variable power scopes. By turning the power ring, the user can change the magnification power of the scope. This feature is not found in a fixed power scope.

The windage adjustment control (5) allows the user to adjust the scope in the horizontal direction (left or right). The elevation adjustment control (6) allows the user to adjust the scope in the vertical direction (up or down).

The objective lens (7) is the large lens which is further away from the user. This lens concentrates the light that goes through the scope. Larger lenses let more light in and in general, the larger the lens, the higher the magnification power of the scope. Typically, the diameter of the larger lens is measured in millimeters.

The eye bell (8) encloses the eye piece and the objective bell (9) encloses the objective lens. 

Variable power scopes of higher quality have a parallax compensation control (10). Basically, parallax is an optical effect caused by the objective lens not being coincident with the reticle. Therefore, putting the eye at different points behind the ocular lens makes the reticle crosshairs appear on different points on the target, which could cause aiming errors. The parallax compensation control allows the user to adjust for the parallax effect.

Some scopes (both fixed and variable types) also have a brightness control for the scope's reticle, so that the crosshairs can be seen in low light conditions. Some high-end scopes also have a feature called Ballistic Drop Compensation (BDC) which allows the user to adjust for the effect of gravity acting on a bullet (i.e. the amount the bullet drops as it travels a certain distance horizontally).

In addition to all these, we must also define a term which we used above: magnification. This is the ratio of the size of the image as viewed through the scope, compared to if it was viewed by the naked eye. For instance, if the magnification factor is 4x, this means an object appears 4 times larger in the scope than if the object was seen without it.

In the next post, we will study some more details about scopes.


All About Scopes - II

$
0
0
In our last post, we looked at some basics of rifle scopes. We will continue our discussion in this post.

As we saw in our last post, there are mainly two types of scopes: the fixed power scope and the variable power scope. The big difference between these two is that the variable scope has adjustable magnification. 

We will now look at how these scopes are specified. Fixed power scopes are usually specified as two numbers separated by x. For instance: 4x32, 12x40 etc. So what do these two numbers mean? The first number is the magnification factor of the scope. Therefore, in a scope marked as "4x32", this means it magnifies the image 4x times (i.e.) the object appears 4 times larger when viewed through the scope, than if it was viewed using just the eye. So what is the second number mean? The second number is the diameter of the objective lens in millimeters. Therefore, in a scope marked as "4x32", this means the objective lens is 32 mm. in diameter. In many cases, the unit of measurement is specified, so instead of "4x32", it may be more clearly specified as "4x32 mm."

A Bushnell 10x40 Fixed Power Scope. Click on the image to enlarge.

In the above image, we have a fixed power 10x40 scope made by Bushnell. What this means is that it has a 10x magnification and the objective lens is 40 mm. in diameter.

Variable power scopes also have similar designations, except that they have three numbers. The first two numbers are separated by a hyphen (-) and the third number is separated by x. For instance: 4-16x42, 6-24x50 etc. The first two numbers indicate the range of magnification power of the scope. Therefore, in a scope marked as "4-16x42", this means that the magnification factor of this scope can be varied between 4x and 16x. The third number indicates the size of the objective lens in millimeters. Therefore, in a scope marked as "4-16x42", the objective lens is 42 mm. in diameter. As with the fixed scopes, sometimes the specification include the unit of measurement as well, so instead of "4-16x42", it may be more clearly specified as "4-16x42 mm."

A variable power 4-16x42 variable power scope made by Nikon. Click on the image to enlarge.

In the above image, we have a Nikon model M-223 scope, which is a 4-16x42 mm. scope. This is the model we studied in our last post, when we were studying the different parts of a scope.

So, a 10x magnification is better than a 4x magnification, right? Not quite. It is true that the object appears a lot larger on a higher magnification scope, but you see less of the surrounding area through the scope. For instance, if you're looking at a herd of deer through a powerful scope, you can probably see the fur very clearly, but you will be unable to tell which particular deer you're looking at, because you can only see a part of a deer's body through the scope. Also, it is very easy to lose sight of a particular deer if it moves off a bit, because the powerful scope only shows a small area at a time. Bear in mind that with a 10x scope, the field of view of an object at 100 yards (90 meters) is about 2 feet (0.66 meters) diameter. With a lower powered scope, you may be able to see both the head and the body of the deer and can tell which one it is in the herd. 

Higher magnification also reduces the brightness of the image. For instance, if you have two scopes, a 4x40 and a 10x40. They both have the same size objective lens (40 mm.), but they have different magnification power 4x and 10x. The image seen through the 4x40 will be brighter than that seen through the 10x40. This has to do with the exit pupil, which we studied about in the last post. The 4x40 scope has an exit pupil of size 10 mm., whereas the 10x40 has an exit pupil of 4 mm.

A scope with higher magnification is useful against targets at a long distance, but not as useful against targets close by.

Therefore, for general purpose hunting, a scope with magnification in the range of 3x to 10x works fine for many hunters. Some use variable power scopes that work in this range (such as a 3-7x or a 3.5-10x scope), others are perfectly happy with a 4x or 6x fixed power scope, some even go for lower power, such as 1.5x or 3x, because they don't hunt at longer distances. For long distance shooting, scopes with magnification of 9x to 18x or so are used and anything more than that can only be used for shooting at targets that don't move.

For most soldiers, the US military have generally equipped them with fixed power scopes, because soldiers work in stressful environments and a fixed power scope saves them worrying about which magnification factor the scope is currently set at. Most military scopes have relatively low magnification, so that they are useful at ranges where combat usually occurs. The US Army, Air Force and Marines use the Trijicon TA31RCO ACOG sight, which uses a 4x32 fixed power scope. The scope has advanced features, such as dual illumination technology provided by fiber optics and tritium.

US Marine using his ACOG scope. Click on the image to enlarge. Public domain image.

Most other military forces also do the same thing for their soldiers. For example, Canada's soldiers are equipped with a C79 optical sight which is a 3.4x28 scope, British soldiers have a standard SUSAT L9A1 sight which has a 4x25.5 scope, Steyr AUG rifles (used by Austria and Australia) have a built-in 1.5x scope made by Swarovski (the same people that make luxury glass chandeliers and jewelry).

Canadian C79 Elcan sight. Click on the image to enlarge. Public domain image.

Snipers have also traditionally used fixed power scopes until recently. During World War II, German snipers used 4x fixed power scopes and US snipers used 8x scopes made by Unertl through World War II and the Korean war. By the Vietnam era, 10x fixed power Unertl scopes were in use by the US Marine snipers, although a variable power Redfield 3-9x scope was also tried out. The Unertl model MST-100 which is a 10x42 fixed power scope, remained in US Marines sniper service for quite a while (until about 2007 or so). The US Army snipers used the Leupold Ultra M3A 10x42 mm. scope or the Leupold Mk 4 LR/T M3 10x40 mm. scope until recently as well. In the recent years, US snipers have been experimenting with variable power scopes. For instance, US Marine snipers have been working with the Schmidt & Bender 3-12x50 mm. scope and the US Army snipers have been working with the Leupold Mk 4 3.5-10x40 mm., Leupold Mk 4 M1LR/T 8.5–25×50 mm. and Leupold Mk 4 6.5–20×50 mm. ER/T M5 scopes. Sandia National Labs also recently demonstrated the RAZAR (Rapid Adaptive Zoom for Assault Rifles) technology based on a request from the US military to develop a compact zoom rifle scope.

In our next post, we will look further into some of the technologies inside a scope.


All About Scopes - III

$
0
0
In our last couple of posts, we studied about different types of scopes and what they look like from the outside. In today's post, we will look at some of the stuff inside a scope. Specifically, we are going to study about a part called the reticle.

We actually dealt with reticles a little over four years ago, when we studied telescopic sights originally. A reticle is a device consisting of fine lines, which is embedded into a telescope and helps the user to line up a target precisely.


The classic image of a telescopic sight is a target centered around two crosshairs, such as the image above. This is usually what is shown in movies and TV shows. However, there are many different types of reticles, which we will study.

Different types of reticles. Public domain image.


Thanks to movies, most people are familiar with the Fine Crosshair type of reticle above. Fine crosshairs allow the user to see more of the target and do not block out much light. However, it is easier for the user to lose sight of the lines, especially in complex backgrounds. Thicker lines are more visible, but they block out more of the image and lose some precision. Therefore, modern telescopic sights use a mixture of both (i.e.) thicker lines on the outside and thinner lines closer to the middle. Examples of this would be the Duplex Crosshair, the Mil-Dot and the Modern Rangefinding reticle above. The thick lines allow the user to quickly figure out where the center of the reticle is and the thinner lines allow for precision aiming.

Back in the day, the crosshairs of reticles were made of  natural fibers, such as hair or spiderweb. Later on, they were made of thin wires (and many scopes still use wire crosshairs to this day, especially cheaper ones). The wires are mounted on the inside of the telescope tube. By flattening the wire in different places, the manufacturer can make Duplex Crosshairs or Target Dot type crosshairs. The nice thing about wire reticles is that they don't block out much light and very durable.

Another technique to make the crosshair lines is to etch the lines onto a thin plate of glass, using a diamond cutter. The thin plate of glass is then mounted inside the scope. The etched lines allow for more complex crosshair shapes, including circles, lines that don't need to touch or have gaps in between. This allows them to have features such as estimating range and bullet drop (such as that seen in the Modern Rangefinding and the SVD type above). The etched lines block off a bit more light and the thin glass plate may reflect some of the light back instead of letting it through. Modern scopes usually coat the glass with special coatings designed to minimize the reflected light.

For aiming in low light conditions, many scopes have illuminated reticles. The illumination is usually provided by a few methods. The first is to use a bit of fiber optic cable to collect ambient light from the outside of the scope and deliver it inside to the reticle. Another technique is to use a battery powered LED to provide enough light to illuminate the reticle. While this method requires the user to carry a battery with the scope, it has the advantage that the user can usually adjust the brightness by turning a knob. The user may also be able to change the color of the backlight illumination, if the LED method is used. The third method, which is used in military scopes, such as the Trijicon ACOG, or the British SUSAT sight, is to use tritium, which is a mildly radioactive form of hydrogen, to provide illumination. The tritium slowly decays and emits light as it does so. The nice thing about this is that tritium glows for a long time and could last 11 years or more before the tritium tube needs to be replaced.

As you may have observed in movies, if the crosshairs are backlit, they are usually red, though some products use green or yellow. There is a good reason for this. Red happens to be the color that least interferes with the user's night vision.

Reticles may be mounted inside the telescope tubes in one of two spots: the first focal plane (FFP) or the second focal plane (SFP). For fixed power scopes, it doesn't make any difference which focal plane the reticle is mounted at, but it makes a difference for variable power scopes. If the reticle is mounted at the first focal plane, then the size of the reticle resizes with the target (i.e.) if the user adjusts the magnification to zoom into the target, the reticle also appears to enlarge in size and if the user adjusts the magnification to zoom out of the target, the reticle also appears in decrease in size correspondingly. If the reticle is mounted on the second focal plane (i.e. closer to the eyepiece), then the size of the reticle remains a constant, irrespective of the magnification power. Americans tend to prefer scopes with reticles mounted SFP and this is used in the majority of the scopes. Some high end European manufacturers make FFP scopes on request.

We will study more about the advantages and disadvantage of FFP and SFP scopes, when we study the topic of scopes and rangefinding tomorrow.

All About Scopes - IV

$
0
0
In our last post, we studied some details about the reticle inside a scope. In today's post, we will look into some more uses of reticles, namely rangefinding. We had actually dealt with this topic some time ago, when we talked about telescopic sights.

The key to rangefinding in most scopes is to compare an object of known height or width against a series of markings on the reticle, to determine how far away it is. We will see how this works with a few examples.

Reticle from a Russian PSO-1 Scope, as used by the SVD rifle. Click on the image to enlarge. Public domain image.

The above image shows the reticle from a PSO-1 scope, which was originally designed for use by the Soviet military Dragunov SVD sniper rifle. When this was originally introduced in 1964, it was the most advanced mass-produced scope available. This scope is a fixed power scope with 4x magnification. It has several markings on it. The top chevron (^) mark is used as the main aiming mark. The horizontal marks (10...10) are used for adjusting for windage and also allow to lead the target, in case it happens to be moving. The horizontal marks can also be used for rangefinding, if the width of the target is known beforehand. Each marking on the horizontal 10..10 marking is spaced at one milliradian interval, therefore the calculation for finding distance can be determined by the following formula:

D = S / mils * 1000

where
D = distance to target in meters
S = Known height or width of target in meters
mils = Number of markings wide that it appears when viewed through the scope

Say the user is viewing a Land Rover vehicle, which is known to measure about 4 meters long (i.e. 13.12 feet long). Let's say that when it is viewed through the scope, it measures up to 8 markings long. Then, we put S = 4, mils = 8 in the above formula and calculate D = 4/8 * 1000, which works out to 500 meters. Therefore, the Land Rover is approximately 500 meters away from the scope.

Also notice the curved line on the lower left quadrant with the numbers (10..2). This can also be used to measure distance to the target, in this case using a human for range finding. The markings assume that an average human is 1.7 meters (5 feet 8 inches) tall. The user simply aligns the scope so that the person's feet touch the bottom horizontal line and see which marking the person's head touches, as shown in the image below:

Public domain image

In this case, the person's head touches the 4 mark, which means that the person is about 400 meters away. Using this set of markings, the user can determine ranges from 200 to 1000 meters.

The PSO-1 scope has a bullet drop compensator (BDC) to adjust range in 50 meter increments from 100 meter to 1000 meter ranges. Therefore, once the range to the target is determined, the user can turn the knob and adjust the elevation to correspond to the appropriate range and then align the target with the top chevron mark (^).

Notice that the scope also has other chevron marks (^) below the first one. These are used to shoot at ranges beyond 1000 meters. The user sets the elevation to the maximum of 1000 meters, then uses the other chevrons to line up to 1100, 1200 and 1300 meters respectively.

Now we'll look at another reticle.

Reticle used by Schmidt and Bender scope. Public domain image.

The above reticle is used by scopes made by Schmidt & Bender. Note that the center of the scope has several dots in the horizontal and vertical lines. These are called mil-dots and each dot corresponds to 1 milliradian. Therefore, if the width or height of an object is known, the user can determine the range by counting the number of dots that it covers and then using the same distance formula that we saw above for the PSO scope. Therefore, if an average person, who is about 1.7 meters tall (or 5 feet 8 inches tall), covers 4 dots when viewed in the scope, we can take S = 1.7, mils = 4 and plug it into the formula D = 1.7/4 * 1000, which works out to 425 meters.

There is also another way to quickly compute the range with this reticle, without doing any arithmetic. Note that the bottom of the reticle, there is a long horizontal line and above it are a series of smaller horizontal lines in a step pattern. These lines can be used to quickly estimate the distance to a target, using a human as the scale. To estimate distances between 100 and 250 meters, the user simply frames the target's head between the lines as shown below:

Public domain image.

The average human head is around 0.25 meters high. The two lines that best frame the top of the helmet to the chin tell the distance to the target.

For longer ranges, the same horizontal lines can be used, except that the user frames the top of the target's head to the belt buckle between the two lines.

Public domain image

Using this, the user can measure distances between 400 and 1000 meters.

Note that in both these instances, the scopes are fixed power models. Therefore the user cannot adjust the magnification power and the rangefinding calculation is easier.

For scopes with variable power magnification, the method of rangefinding depends on whether the reticle is placed on the first focal plane (FFP) or second focal plane (SFP).

Recall in our last post, we mentioned that if the reticle is placed on the first focal plane, the size of the reticle resizes with the magnification, so if the user zooms into the target, the reticle also appears to enlarge in size correspondingly. So, if a target measures 4 mil dots at 3x zoom, it will still measure 4 mil dots at 10x zoom, when using a FFP reticle. Therefore, for a variable power scope using a FFP reticle, the range calculation formula is the same as that of the fixed power scope, D = S/mils * 1000.

We also mentioned in our last post, that in a reticle placed at SFP, the size of the reticle does not change with magnification power. Therefore, for a SFP scope, the mil-dot range estimation is calibrated accurately only at one particular magnification power, generally at the highest magnification power setting, or sometimes at the middle magnification power setting. Some SFP scopes have an index mark on the power ring, to show at which magnification power setting the mil dots are accurate (for instance, some manufacturers set it at 10x power, Bushnell generally sets theirs at 12x power). The formula for range estimation changes a bit in this case. Assume a SFP scope where the mil-dots are calibrated accurately at 10x magnification power. The distance formula for this scope is:

D = (S/mils) * (mag/10) * 1000
where
D = Distance to the target in meters
S = Width or height of the target in meters
mils = Number of markings covered by the target
mag = Magnification power of the scope.

As you can see, with a SFP scope, the range calculation is a bit harder to do because it depends on the magnification power setting on the scope. Therefore, some users usually set their scope at the power setting that it is calibrated at and leave it there, so that they don't have to do the extra math. For instance, in the above example, if the magnification power is set to 10x (i.e. the same magnification power that it was calibrated at), the formula simplifies to D = S/mils * 1000 (i.e.) the same formula as for a fixed power scope. Alternatively, if they change the magnification power, they change it to half or double of the calibration setting. For example, a Bushnell Elite 4200 6-24x40 variable power scope is calibrated at 12x magnification power, so if the user wants to change the magnification power, they usually select 6x or 24x, so that the range calculation can be modified by dividing or multiplying by 2. If the user chooses any other magnification power settings, the math becomes correspondingly harder.

This is why many military scopes use fixed power scopes, to reduce the amount of math calculations that the user has to do, and also avoid the chance that the user makes an incorrect calculation due to not paying attention to the magnification power setting of the scope.


All About Scopes - V

$
0
0
In our last few posts, we studied telescopic sights from the outside and in our previous post, we studied one part that is inside the scope, namely, the reticle. We also talked about terms like First Focal Plane (FFP) and Second Focal Plane (SFP) in our previous post. In today's post, we will look into the parts of a telescopic sight in more detail and find out what FFP and SFP really mean.

Before we dive into a telescopic sight, let us first study lenses, especially the type of lens used in telescopic sights, namely the biconvex lens (also sometimes called a converging lens). A biconvex lens is thicker in the middle and thinner at the edges. It is typically made of a transparent material, such as glass. Since glass has a greater density than air, light bends as it passes through it (you can observe the same effect if you look into a pool of water, as objects at the bottom of the pool appear to be at a different location than where they really are, due to the light rays bending as they enter it.) In a lens of this type, when light from a great distance passes through it, the light is concentrated to a spot on the other side of the lens, called the focal point, as shown in the diagram below:

Image licensed under the GNU Free Documentation License Version 1.2

The distance between the center of the lens and the focal point is called the focal length of the lens (marked as 'f' in the figure above). Before you start yawning after reading this material, you may actually be familiar with the concept of focal length, but not realize it. As children, many of us have used a magnifying glass to burn holes into a sheet of paper (admit it, you did it too). The trick is to move the lens up and down to adjust the focus, until a tiny concentrated image of the sun appears on the sheet of paper. When the paper starts to burn, the distance between the lens and the sheet of paper is the focal length of the lens.

Now let us consider an object as viewed through a lens, as shown in the image below:

Image licensed under the GNU Free Documentation License Version 1.2

When the object is at a distance S1, at a great distance from the lens, an image can be projected onto a screen at a distance S2 on the other side of the lens (where S2 is much smaller than S1). We will not study the cases where the object is located at a closer distance to the lens (e,g. if it is closer than the focal length or twice the focal length), as these are irrelevant to our object of study.

The main thing to notice in the above diagram is that the image is upside down because of the way that the lens bends the light reflecting from the object. As you can imagine, this is not very useful for telescopic sights because people aren't used to seeing things upside-down. We will study how this is rectified later.

Now that we've studied how light passes through a single lens, let us study how light passes through two lenses (i.e.) a simple refracting telescope similar to one used by Galileo in the 17th century,

Click on the image to enlarge

The above image shows how light passes through two lenses. The lens on the left is the larger objective lens, which has a longer focal length, and the lens on the right is the eyepiece lens (otherwise called the ocular lens). We encountered these terms a few posts ago, when we studied the external parts of a scope.

As you can see from the images above, the two lenses collect more light than a human eye can by itself, and give the user a brighter magnified image. Note that because of the way that the light bends, the image that the user sees is upside-down. The fact that the image appears upside-down doesn't matter when viewing symmetrical objects such as stars, the sun, the moon etc. However, it does definitely matter when viewing targets on the earth, as users prefer to see their targets aligned in the proper direction.

Therefore, scopes work around this issue by having another set of lenses in between the objective lens and the ocular lens. These intermediate lenses also flip the image, therefore when it comes out of the ocular lens, the double inversion causes the image to be turned back to the correct direction, the way that most users like to see it. The image below shows how this works:

Internals of a telescopic sight. Click on the image to enlarge.

Light passes through the objective lens and the image is inverted, as we have already seen a few paragraphs above. It then passes through another set of lenses, labelled as the picture reversal assembly (also called "erector lenses") in the image above. These lenses serve to invert the image again, which means by the time it passes through the ocular lens, the image is flipped back to the correct direction. In variable power scopes, there is a mechanism to allow the erector lenses to be moved back and forth, which changes the magnification power of the scope.

Also note that the first focal plane (FFP) reticle is located at the focal length of the objective lens. There is also a second focal plane (SFP), which is located at the focal length of the erector lenses that comprise the picture reversal assembly. The reticle can be placed at either the FFP point or the SFP point. We studied the implications of placing the reticle at FFP vs. SFP a couple of posts ago and also in our last post.

We will study more about the internal parts of a scope in the next post.


All About Scopes - VI

$
0
0
In our last post, we started looking into what is inside a scope. In today's post, we will look more into the subject of lenses, as used in scopes.

Lenses can be made of different materials. Cheap scopes might use lenses made of plastic, whereas better quality scopes have glass lenses. Really high quality scopes use correspondingly high quality glass for their lenses. We will look into what all this really means.

During physics classes in school, the reader might have seen diagrams about lenses similar to the one shown below:

Image licensed under the GNU Free Documentation License Version 1.2

We saw this image in our previous post. It shows that light coming from a great distance is focused by our lens, onto a point and the distance between the center of the lens and this focal point is called the focal length (shown by 'f' in the image above). Well, this is all very good in theory, but in actual practice, some of the incoming light is reflected back, instead of passing through the lens. This happens even on lenses made of glass. Anyone can verify this fact by looking out of a plate glass window -- notice that there is a faint reflection of yourself visible through the glass, no matter how well polished it is.

The amount of light being reflected back depends on the material that the lens is made of. This reflection can be reduced by applying coatings on the lens (we will study these in a few minutes.) Typically, each air-to-glass surface could reflect back about 3-6% of the incoming light and each lens has two such surfaces. Now, in a simple telescope, we just have two lenses and that's four surfaces. However, as we saw in the previous post, just using two lenses in a tube gives the user an inverted image. If we need our image to be facing the correct direction, we need at least two more erector lenses to flip the image back up and we may also have another flat glass plate onto which the reticle is etched. Suddenly, we are looking at upto 10 surfaces and maybe even more, if there are more lenses or glass plates inside the scope, upto 16 or 18 surfaces even. The amount of light being reflected back by all these surfaces start to add up and this means we could be losing upto 50% of the light coming into the scope, due to the reflections from the various surfaces. Therefore, in low light conditions, it could make the image much harder to see.

So where does this reflected light go? In many cases, it doesn't just disappear off into the distance. Instead, a part of the reflected light keeps bouncing from surface to surface of the various lenses inside the scope and after the second, third or fourth (or fifth, sixth etc.) reflection, some of this light eventually comes out of the eyepiece. This scattered light is what causes the so-called "lens flare", which causes the image to become hazy, reduces the contrast of the image, removes image details and shows rings of different colors around the image.

An example of lens flare. Notice how hazy the image looks.

One more thing to note is that the glass in the lens does not pass all wavelengths of light through the same way. Therefore, rays of light of one particular color may reflect more light from the glass than rays of light of a different color.

The way to reduce all these problems is by applying special anti-reflection coatings on the glass surfaces. As early as 1886, Lord Rayleigh had discovered the use of thin film coatings on lenses and in 1909, Harold Dennis Taylor had discovered a chemical process for producing such coatings for Cooke Optics Ltd (a British manufacturer of camera lenses). These coatings work because they have a refractive index value that is between the refractive index values of air and glass and they reduce the amount of light reflected back than if the light were to directly travel from air to glass. Coatings of this sort can halve the loss due to reflection.

Another type of anti-reflection coating is based upon using the principle of light interference, first discovered by Alexander Smakula, an Ukrainian-born scientist working for Carl Zeiss AG of Germany in 1935. This was a significant improvement to anti-reflective optical technologies and the invention was classified as a German military secret during World War II. Most modern lens coatings use this type of coating.

The most common coating material used these days is magnesium fluoride, although aluminium oxide and titanium oxide are also used. Cheap manufacturers use the dip and bake method to apply the coating, but these coatings do not stick to the lens as well and can wipe off in a year or so. High end manufacturers use a different more expensive method involving molecular bombardment and vacuum chambers to apply a thin film on the lens surface. Applying a single layer of coating can drop the reflective light loss to about 1.5-2% (compared to 3-6% for an untreated surface).

Of course, the major shortcoming of a single-layer coat is that it works best on particular wavelengths  (colors) of light, particularly if the thickness of the coating is equal to 1/4th of the wavelength of the light. The solution is to apply multiple layers of coatings, each one geared towards reducing reflective light over a different range of wavelengths. The best multi-layered coatings can reduce the reflective light loss to around 0.2% or so per surface, which means that scopes using these coatings can let over 95% of the light through and produce a very sharp image indeed.

Besides these anti-reflective coatings, some lenses also have additional coatings applied for a couple of different purposes. Anti-scratch coatings make lenses more durable and help prevent minor scratches from happening on the lens surfaces. Some lenses also have a coating that prevents water from sticking to the glass. This is because water droplets can increase the glare and reflectivity of a glass surface. Applying a coating that repels water allows the scope to be used in rainy or foggy conditions, without affecting image quality as much.

A coated lens will show a colored hue when viewed from the side. Blue hues, purple hues, green hues, red hues and pink hues are commonly seen. The color is not the color of the coating material (which is colorless), but is the color of the wavelength of light that the coating is least effective against (which is why it is being reflected back instead of being let through).

Of course, adding additional coatings also increase the price of the scope. The industry uses a few terms to describe how many coatings are applied. We will look at some of these terms now.

If the manufacturer says that their scope has "coated lenses", this means that the lenses have a single layer of anti-reflection coating applied. Usually, this coating is not applied to all the lenses in the scope either, but only to the first and last lens (i.e.) only the lenses that you can see from outside the scope. Some really cheap manufacturers only coat the outer surfaces of the two outside lenses and leave the rest uncoated.

If the manufacturer says that their scope has "fully coated lenses", this means that all the lenses  in the scope have at least one layer of anti-reflection coating applied to every surface. This offers a significant improvement over the scopes described in the previous paragraph.

If the manufacturer says that their scope has "multi-coated lenses", this means that at least some of the surfaces have multiple layers of anti-reflection coatings. This does not mean that all the lenses have multi-layer coatings applied though. Quite often, the multiple layers are only applied to the outer surfaces of the first and last lenses only (i.e.) the two lens surfaces that can be seen from the outside of the scope. The first multi-coated lenses were available commercially some time in the 1970s.

Finally, we have the scopes that are "fully multi-coated". This means that all the lenses in the scope have multiple layers of anti-reflection coating applied to all their surfaces. These are usually the most expensive types of scopes.

In general, fully coated lenses and fully multi-coated lenses produce better images than the other types.

Besides these coatings, the scopes may use additional coats. Some manufacturers apply a hard protective coating to the outside surfaces of the first and last lens, which protects the lenses from scratches and abrasions (e.g. DiamondCoat and DiamondCoat 2 by Leupold). Hydrophobic coatings break up water droplets and prevents them from sticking to the lenses. Hydrophobic coatings are available from several manufacturers, such as Leupold, Bushnell, Pentax etc. and are known by different names, such as RainCote, Rainguard, Hydroshield etc.

It must be noted that lens manufacturing technologies have significantly improved over the years. Today, it is possible to buy a cheap telescopic sight for less than $100, which has better resolution, magnification and light gathering properties than the best telescopic sight manufactured around 50 years ago. In fact, the cheap scope may not even have glass lenses, but might be using optical grade plastic lenses instead!

In our next post, we will look at some more details of the internals of scopes.

All About Scopes - VII

$
0
0
In our last post, we looked at lenses used in a scope, as well as lens coatings. In today's post, we will study some more details about modern scopes.

One of the requirements of a good scope is that it must be usable in all weather conditions. In the early days of telescopic sights, moisture and dust particles would enter the body of the scope and deposit on the lenses from the inside, which causes distortion of the image. Many modern scopes are now made weatherproof or waterproof. There is a difference between the two terms: weatherproof scopes can withstand a bit of light rain, but cannot really be immersed in water, whereas waterproof scopes can generally be immersed completely in water for a little while and still work. Fully waterproof scopes are completely sealed using multiple neoprene rubber O-ring seals around the external facing lenses and the control knobs. This ensures that not only water is kept out, but so are dust particles and small debris as well.

Back in the early 1940s, one of the major problems of scopes was that the lenses would fog up, when exposed to rapid temperature changes, especially in humid areas. The fog or mist would settle on the lenses and make the scope unusable. This is one of the reasons that legendary Finnish sniper, Simo Häyhä, used his iron sights instead of his telescopic sight, during the Winter war between Finland and Russia. A scope can be affected by fog, even if it is completely sealed. This is because the air inside the scope may contain water vapor and oxygen, while it is is being sealed in the factory.  The solution to this issue was first invented by Leupold in 1947. Their solution was to replace the air inside the barrel tube with a gas that has no moisture content and therefore, cannot form condensation on the lenses. The first fog-proof scopes made by Leupold were filled with nitrogen gas. These days, fog-proof scopes are usually filled with nitrogen, argon or a mixture of argon and krypton gases. The scopes are hermetically sealed to prevent the gases from leaking out. It must be noted that just because a scope is waterproof, doesn't imply that it is fog-proof, because the scope may have been completely sealed to make it watertight, but the air inside it could still contain water vapor. On the other hand, if a scope is fog-proof, it implies that it is waterproof as well, and the air inside it has been purged out and replaced with a dry gas containing no water vapor, before it was sealed. Quality scope manufacturers will often advertise that their scopes are "nitrogen purged", "argon purged" etc. What this means is that the air inside the scope has been replaced by nitrogen or argon.

One more thing to note about fog-proof scopes is that only the interior lenses in the sealed scope body will not fog up. It is still possible for condensation to form on the surfaces of the two outside lenses, because these are exposed to the atmosphere.

It must be noted that before good seals were invented for scopes, mold and fungus could also form on the inside lenses of a scope. Now, with the scopes being hermetically sealed and filled with a gas that does not support life, this does not happen any more.

View from a Romanian-made PSO-1 scope, originally invented by the Soviet Union

The above image shows the view from a Romanian PSO-1 scope, which was originally designed by the Soviet military for the SVD rifle. The PSO-1 is completely sealed and filled with nitrogen gas to prevent fogging, and it can reliably function with temperature ranges of -50 C to 50 C (-58 F to 122 F)

The outside of the scope body also needs to be tough, but light. Back in the day, when the first scopes were developed in the 1830s and 1840s, they used to be made out of brass, due to its resistance to corrosion. In 1855, William Malcolm opened a factory to make rifle scopes in Syracuse, New York. His scopes were among the first to use a seamless steel tube for the body of the scope. While steel is a much more durable material than brass, it is also much heavier. During the 1940s, due to inventions made by the aviation industry, aluminum alloys were developed and the prices of aluminum dropped as well. Many modern scopes today have bodies made of aluminum alloy. An aluminum body is also pretty durable, but it is much lighter than steel. In order to resist corrosion, most aluminum bodies are anodized or hard anodized. High quality scope manufacturers use 6000 series grade of aluminum, which are generally referred to as "aircraft aluminum alloys", because these are heavily used by the aviation industry. Examples of these aluminum alloy grades are 6061-T6 and 6061-T651, and if a high end manufacturer is using these, they will let you know in the advertising, because these grades of alloy are much more expensive than ordinary aluminum alloys.

In our next article, we will discuss parallax error and how to work around it.

All About Scopes - VIII

$
0
0
In our last post, we looked at how manufacturers make their scopes waterproof, fog-proof, durable etc. In today's post, we will look at the subject of parallax errors, as it pertains to scopes.

Parallax is the optical illusion that causes objects to appear aligned if they're not in the same plane, when viewed from a different angle. Well, that's the textbook definition, but what does that really mean? Assume you're sitting in the passenger seat of a car and your friend is driving. If you look at the speedometer, it may appear to you that he is driving at, say, 75 mph, when he's really driving at 70 mph. This is because you are viewing the speedometer from an angle and since the speedometer needle is at a different plane than the dial behind it, you think the speedometer is showing a different speed than your friend, who is sitting in the driver's seat. This optical illusion is called the parallax effect.

So now that we know what parallax is, how does it apply to scopes? Assume a simple scope with only two lenses, an objective lens and an ocular lens, and a reticle in between. If the reticle is not placed at the focal plane of both lenses in the scope (i.e.) if the focal length of either of these two lenses is not exactly the same distance as the distance from the lens surface to the reticle, then parallax error happens. Due to this focusing error, moving the eye behind the eyepiece causes the reticle to appear to point to different parts of the target. Therefore, this makes aiming dependent on where the user places his head, which may cause the user to miss smaller targets, because he thinks he's aiming at the target while he's really aiming to one side of it.

For scopes with 4x magnification or lower, the effect of parallax error is not that significant. For higher magnification power scopes or variable power scopes, the effects are bit more significant. The problem is that the focal plane moves as the distance to the target changes. So, there are a few ways to handle this:

  1. The simplest way is to adjust the scope at the factory, so that it is parallax corrected for the range that it is most expected to be used. This range is called the zero-parallax range. For most hunting scopes, this is typically somewhere between 100 and 150 yards and some military scopes are parallax corrected at 300 meter ranges. This is the approach used by most scope manufacturers. For targets at ranges outside what the scope is adjusted for, there will be some parallax error. However, in many cases (e.g. high powered hunting rifles), the error at ranges outside the zero-parallax range is acceptable, because the target on the other end is relatively large.
  2. The second method is to make the objective lens of the telescopic sight be adjustable, so that the focal plane can be moved to compensate for a target at a different distance. Such scopes are called AO or A/O models, with the letters AO standing for Adjustable Objective.
  3. The third method is the most complicated, but it involves making an internal lens in front of the reticle adjustable, to move the focal plane back and forth to compensate for parallax errors. Naturally, there has to be some gear mechanism to adjust the position of the internal lens. Typically scopes will have an extra parallax knob on one side and turning this knob operates the mechanism that moves the internal lens around.

So how does a person check if a scope is parallax corrected properly at a given range? The procedure is simple:

  1. First the person aims the scope at a target at a known range.
  2. Next, the person secures the rifle so that it cannot move.
  3. After that, the person views the target through the scope and moves his head around, without touching the rifle.
  4. If the reticle's cross-hairs appear to move to different parts of the target when the user's head is moved, the scope is not parallax compensated at that range. If the cross-hairs stay pointing to the same place on the target, this means the scope is parallax compensated correctly at that range.
In our next post, we will study mounting accessories for scopes.

All About Scopes - IX

$
0
0
In our last few posts, we looked at scopes, both from the inside and the outside. But how does the scope get attached to a rifle. We will study how scopes are mounted in today's post.

Some rifles, such as the Steyr AUG, are already manufactured with built-in scopes,
Steyr AUG Assault rifle. Click on image to enlarge.
Image licensed from Steyr Mannlicher GmbH & Co. under the Creative Commons Attribution 2.0 License.


In many other rifles, they already come with some sort of mounting system built in (e.g. Weaver rail, Picatinny rail etc.). Examples of this would be the M4, H&K 416 etc. Even if there is no rail system built in, many modern rifle manufacturers usually have a couple of holes drilled into the receiver, so that the user can attach a scope mount base later. As for rifles that were built before scopes became popular (e.g. the Mosin Nagant rifle), a scope can still be attached to these, either by replacing the standard rear sight with a sight that allows a scope to be mounted, or by drilling the appropriate holes into the receiver and/or stock and attaching a scope base. Of course, the last couple of procedures are probably best done by a qualified gunsmith.

Assuming this is a relatively modern rifle, the receiver should already be pre-drilled or grooved to attach a scope base. The first step is to remove any filler screws and degrease the screw holes, then mount the scope base on to the rifle, applying a little bit of loctite or oil to the screws before screwing them in. '

The next step is to attach the scope rings to the base. These come in two halves, which can be separated.

Scope rings

The bottom of the scope rings are shaped with dovetails to attach to the scope base securely. The next step is to ensure that the scope rings are aligned correctly. To do this, the user uses a scope ring alignment tool. This consists of two precisely machined rods with pointed conical tips. The user slides one rod into each ring and tries to adjusts the alignment of the two scope rings until the two pointed ends of the two rods are almost touching.

Scope Ring Alignment Tool by Wheeler


Once the two scope rings are aligned properly, the user unscrews the top halves of the two scope rings, drops the scope in to the lower halves and then screws the top halves back on. Care is taken to mount the scope a little forward (i.e. give it eye relief), so that there is enough gap between the scope and the user's face to account for any recoil after the rifle is fired.

Once the scope is attached, the next step is to align the sights properly. One cheap way to do this is to remove the bolt from the rifle, then aim it at a target by looking through the barrel from the back, then ensure that the scope crosshairs are also pointing to the same point on the target. Of course, this only works for bolt-action rifles and doesn't work with lever action or semi-auto rifles. For these rifles, a laser bore sighting tool is used instead. These usually slide into the muzzle, or can be placed in the chamber. Either way, they project a laser beam, which can be pointed to a target and then the user can check if the scope crosshairs are also aligned to the same point or not.

In chamber bore sighting tool.

Bore sighting tool.


After this, the user needs to still take the rifle out to the range and align the sights properly by firing test-groups at a target.

The next two videos by Midway USA show how this process is done in detail:


Happy viewing!

Firearm Myths - 5 (Fun with Lasers)

$
0
0
We haven't covered any myths for a while, the last article was over 2 years ago. In today's post, we will cover a scene that often shows up in movies and TV. Check out the two screen captures from the popular TV show Sherlock, starring Benedict Cumberbatch as Sherlock Holmes and Martin Freeman as Dr. John Watson.


Click on the images to enlarge.

In the scene, Sherlock Holmes has just arranged a meeting with his arch enemy, Moriarty, and plans to use his pistol on him. Unfortunately for Sherlock Holmes, Moriarty has planned for this and has positioned snipers in the buildings around, and they are pointing their red laser sights at Holmes and Watson.

Now, we look at another scene from a different movie, Captain America: The Winter Soldier.


Scene from Captain America: The Winter Soldier

Here we see that agent Jasper Sitwell is taking a phone call that informs him that he has just been targeted by a sniper and he looks down to see a red dot visible on his tie.

So, do snipers actually use red lasers on their sights? Let's see what the real story is.

First, red lasers are not really very visible in bright daylight, a fact we covered a while ago. Green lasers are a bit more visible, but use up a lot more battery power. So, the scene from Captain America, where a red laser is used, is a bit of Hollywood movie magic and is not possible in real life.

Now let's look at another thing about laser sights. They are useful to acquire targets quickly at short range, because the user can see exactly where the weapon is pointing at, without peering through the weapon's iron sights, especially in low light conditions.

However, laser sights are not useful for long range snipers, due to a few reasons:

  1. The primary goal of a sniper is to stay hidden. If a real sniper used a laser like the types shown in the images above, everyone would know where the sniper is, because they can just follow the laser beam back to the source.
  2. The target will also know that he or she is being targeted and can possibly attempt to take evasive action.
  3. Laser light travels in a straight line, but bullets don't. A laser sight completely ignores the effects of gravity, wind, air density etc. This is why rifle sights have adjustments for elevation and windage
For these reasons, the scenes with the snipers are highly questionable. They look pretty good on TV though.

What is a brass catcher?

$
0
0
Today's post will be on the topic of brass catchers, otherwise called shell catchers. What is a brass catcher and what does it do for the user?

A brass catcher is a device to collect the fired cartridge cases. They come in many shapes and sizes and price ranges. Cheap ones can be found for about $8.50 or so, and expensive ones can cost around $80.00 or so. The images below show some brass catchers:


Click on the images to enlarge. Public domain images.

As you can see by the above images, they come in different shapes and sizes and are made of different materials. The first one is a mesh bag with an attachment that allows it to be hooked to the picatinny rail on top of the AR rifle. The second one is a metallic net shaped into a cylinder, that is attached to the ejection port on the gentleman's rifle. The third and fourth pictures show a plastic one that attaches to a Ruger Mini 14. Some more expensive shell catchers don't need to be attached to a firearm and come with their own frame and stand and can be positioned on the side of the shooter.

When the user pulls the trigger, the firearm shoots a cartridge and then the ejected case comes flying out of the port. If a brass catcher is attached to the ejection port, the cartridge case falls into it and the brass catcher can be detached and emptied later. If the brass catcher is attached properly, it does not interfere with the functioning of the firearm.

So what is the purpose of a brass catcher then? Well, they are pretty handy to have in a shooting range for a number of reasons:

First, while shooting is a lot of fun, a user still has to clean up the ejected cases afterwards. After all, responsible people don't want to damage the environment and leave their trash lying around. If these cases are collected automatically, cleaning up becomes a much quicker job.

Second, some firearms can eject spent cartridge cases quite far away (like 10-15 feet (3-4 meters) or so). If a range has multiple people at the firing line simultaneously and there are no dividers between the shooters, the hot cartridge cases from one user's firearm can end up getting ejected on to the next shooter's face or body parts, thereby disrupting their concentration and creating an unsafe situation. With a shell catcher attached to the firearm, the hot cases will not fly out and hit the next person in line.

Third, if the floor of the firing range is made of a hard substance, such as concrete or rock, then ejected cartridge cases may hit this hard surface and get dented, dinged and otherwise damaged. For people who like to reload ammunition, damaged cartridge cases cannot be re-used. Cases can also roll off somewhere and get lost. With the prices of brass and ammunition being more expensive these days, reloading cartridges is one way for shooters to cut down their costs, especially those who like to shoot large volumes of ammunition. Investing in a cheap shell catcher suddenly becomes worthwhile, as it quickly recoups its cost with the number of cases that it saves.

Of course, there is a caveat to using shell catchers as well. A shell catcher can alter the balance of a weapon somewhat (at least, for those models that attach to firearms), especially as it starts to fill up with empty cartridge cases. For this reason, it is considered good practice to empty the shell catcher periodically after every magazine or two.

Terminology: Lock and Load

$
0
0
The term "lock and load" is often seen in war movies, especially in scenes with firearms, where a sergeant gives the command to "lock and load" to the troops under him. So what does this phrase mean and what is the origin of it?

The command "lock and load" means to prepare the firearm for firing and put it in condition 1 (i.e.) a loaded magazine is inserted, there is a round in the chamber and the weapon is cocked, but the safety devices are enabled.

So, should the term be "load and lock" or "lock and load" then? Well, it appears that the reason "lock and load" entered into military jargon is because of the M1 Garand rifle.

M1 Garand rifle. Click on the image to enlarge. Public domain image.

In the M1 Garand, to load the weapon, the user first pulls the bolt back and locks it to the rear, and enables the safety in front of the trigger guard. If the bolt is not locked to the rear, it may slam back shut. Once the bolt is safely locked back and the safety is enabled, an en-bloc clip containing 8 cartridges is loaded into the magazine through the top.

Loading a M1 Garand. Public domain image.


When the clip is pushed in, the bolt snaps forward on its own (and if the user is not careful, it may slam into his/her thumb. A common injury among US military personnel was the "M1 thumb"). Once the bolt slams forward, it strips the top cartridge from the clip and the weapon is now loaded. This completes the "lock and load" procedure. The user only needs to disengage the safety and the weapon is ready to fire.

The first time this phrase appeared in a movie was in "Sands of Iwo Jima" starring John Wayne. Since then, the phrase has appeared in many movies (e.g. Saving Private Ryan, Full Metal Jacket etc.) and has become well known in popular culture. It is still used even when the weapon in question is not a M1 Garand. For example, in a M-16, on hearing the command "lock and load", a user pulls back the charging handle and locks the bolt in place, enables the safety, inserts a magazine into the rifle and then pushes the bolt release button to close the bolt.

So why does the procedure enable safeties during the lock phase and before the loading phase. Well, this is because the US military develops its procedures to accommodate all sorts of soldiers, including those who may never have handled a firearm before. As they say, it is better to be safe now than sorry later.


Terminology: Flash in the Pan

$
0
0
In English, the expression "flash in the pan" generally means something that starts off very strongly in the beginning, but fails to deliver a result. The origin of this term actually has to do with firearms. You see, back in the early days of muzzle-loading firearms, such as matchlocks, wheel-locks, snaplocks and flintlocks, the main charge of gunpowder was filled in the barrel, but a second smaller charge of finely ground gunpowder (called the "priming powder") was placed in a small pan on the outside of the barrel, called the "priming pan" or the "flash pan". A small hole (called the "touch hole") connected the flash pan to the inside of the barrel.

A flintlock mechanism. Click on the image to enlarge. Public domain image.

 A matchlock mechanism. Click on the image to enlarge. Public domain image.
In the above image, B is the flash pan with the touch hole leading to the inside of the barrel.

To discharge the firearm, the user would typically ignite the priming powder in the pan by applying some method of ignition (whether a lit match, or sparks from a flint striking steel, or whatever). The priming powder lights up in a bright flame and the flame travels though the touch hole and ignites the main charge of gunpowder that is in the barrel, which discharges the firearm and sends the bullet towards the target.

Well, this is how the operation is supposed to work in theory, but it didn't always happen this way. Sometimes, the priming powder would ignite with a bright flame, but the gun would fail to fire. This could happen for a few reasons:

  1. The touch hole was blocked by soot and dirt.
  2. The flame from the pan didn't travel through the touch hole to ignite the main charge.
  3. The inside of the barrel was wet and the main charge of powder didn't light.
  4. The user forgot to put the main gunpowder charge in the barrel or didn't load it properly and only loaded the flash pan.
In such situations, the user would see a bright flame and a lot of smoke coming from the flash pan, but after that, nothing would happen.


In the video above, the person deliberately creates a "flash in the pan" effect with his flintlock musket, by only loading the flash pan, but not loading the main charge of gunpowder. As you can see, there is a very bright flame in the beginning, but after that nothing happens.

So there you have it: a flash in the pan is a very flashy start, but with a disappointing result at the end.

What is Keyholing?

$
0
0
When a person fires a rifled weapon towards a paper target, the usual result expected is that a round hole corresponding to the diameter of the bullet will appear on the target. However, sometimes a larger hole appears, often the hole may appear longer in one direction than the other, such as shown in the image below:

An example of keyholing. Click on the image to enlarge.

These larger holes sometimes resemble a keyhole and therefore, the effect is called keyholing. We will study the causes of keyholing in today's post.

By looking at the shapes of some of the holes in the above target, the reader may notice that some of those holes look distinctly like the shape of a bullet going through the target sideways. In fact, this is exactly what has happened.

Under normal working conditions, the rifling of the barrel imparts a spin on the bullet, which stabilizes it in the air and makes it travel with the nose pointed forward always. However, if the bullet is not stabilized properly when it comes out of the barrel, it will wobble in the air or repeatedly tumble over itself while traveling to the target. Thus, when it strikes the target, it may not strike it with the nose precisely pointed forward and will therefore leave a larger hole.


In the above image, we see three holes. Observe that all three holes are somewhat larger than the diameter of the bullet. The top most hole is shaped like an oblong and was caused by a bullet not flying straight when it impacted the target. The middle hole is more round, but still has a pointed hole on one end showing that the bullet was wobbling in the air when it hit the target. The bottom hole clearly shows that the bullet was toppling end over end and hit the target sideways.

So what causes the bullet instability through the air? There are several causes for this:

  1. Rifling in the barrel could be worn out, therefore it does not impart enough spin to the bullet while it is leaving the barrel. 
  2. The bullet might be undersized and is therefore not engaging the rifling properly.
  3. The rifling twist rate may not be adequate for the weight, shape and profile of the bullet. For example, the M855 cartridge and the L110 cartridge are both designed for the M16A2. The bullet from a M855 (or SS109) cartridge can be adequately.stabilized by a barrel with a 1 in 9 twist rate (i.e.) 1 turn every 9 inches (228.6 mm.) of barrel length. On the other hand, the bullet from the L110 tracer round cartridge does not adequately stabilize at this twist rate and needs a twist rate of at least 1 in 7 (i.e. 1 turn every 7 inches (180 mm.)) for the tracer bullet to stabilize. This is because while the bullet diameters are the same, the weight,  distribution of mass throughout the bullet and the bullet profile shapes are different, which causes the instability. Therefore, M16A2 rifles come with a 1 in 7 twist rate barrel, so that they can be used with both bullet types.
  4. Leading in the barrel could also cause the bullets to not spin as much when they come out of the barrel.
  5. Damage to the barrel near the muzzle may cause the bullets to wobble or tumble as they come out.
  6. The bullet does not always immediately stabilize in the air as it leaves the barrel and needs to travel a little distance in the air before it gains stability. If the target is too close, the bullet may be still wobbling in the air a bit, by the time it hits the target.
  7. The bullet may have hit something on the way to the target, causing it to tumble in the air for the rest of its journey.
An unstable bullet is undesirable because it flies unpredictably in the air and therefore affects the accuracy of the firearm. An unstable bullet also loses velocity faster and it may not transfer as much energy to the target when it strikes it. 

Keyholing is a sign that the bullets are not being stabilized properly. If a gun shoots maybe one keyhole in 500 shots, it may just be due to a bad bullet, but if it regularly shoots keyholes, then that means there is a problem with the barrel or bullets or both, which needs to be fixed.


Manufacturing Cartridges in the 19th Century

$
0
0
In today's post, we will look at how brass centerfire cartridges were manufactured in the 19th and early 20th centuries. The process we will look at was what was used at Kynoch, a large British manufacturer of ammunition. The brand name "Kynoch" is still used today to sell cartridges, even though they have been merged into a larger company.

The Kynoch factory during this time period, was located in Witton, an inner city area of Birmingham, England.  The factory had several hundreds of machines in a single building, turning out cartridges of many shapes and sizes. The machinery used there can be considered as the latest technology for that era.

The process we will study today is what was used to manufacture solid-drawn brass cartridge cases. The first step in the process is to make flat sheets of a type of brass called "cartridge brass". The brass sheet metal is then taken to a machine that punches out circular blanks from the sheet.

Public domain image.

The image above shows a blank to be used to manufacture cartridges for a Mauser rifle. The next step is to put the blank threw a drawing machine, where it is forced through a die with a tapering aperture by a ram under high pressure. This produces an object that is shaped somewhat like a cup or a thimble, as shown below:

Public domain image.

Naturally, the pressure applied when shaping the cups puts stress on the metal. Therefore, the cups are then annealed. Annealing is a process of heating the object until it is glowing hot and maintaining the temperature for a while and then letting it cool back slowly to room temperature in a room with no breeze blowing. This softens the metal and removes the internal stresses caused by the shaping process. After annealing, the cups are then pickled in sulfuric acid to clean them. They are then forced through the drawing machine again to increase the length of the cartridge case (as shown in step 3 in the image below). The process of annealing, cleaning in acid and then forcing through the drawing machine is repeated multiple times, depending on the type of cartridge case, and the cartridge case is elongated each time until it reaches the size as shown in step 4 of the image below.

Public domain image.

Then the neck is formed by pushing the cartridge case through a press to give it the bottle-necked shape, as shown in step 5 in the image above. The base of the cartridge and the rim are formed by a powerful horizontal punching machine, which forces the empty case into a die to form the base and the cap chamber, as shown in step 5 and 6 in the image above. Finally, two tiny holes ("flash holes") are pierced through the cap chamber, as shown in step 6.

The cartridge cases are then trimmed to the required length and the rims are machined to remove sharp edges  and then, a primer cap is applied to the base of each case by a descending rammer and they are ready for loading. We will study exactly how this was done in the next post.

These days, many cartridge manufacturers use an extrusion process to form the cartridge cases, as it is faster and  more economical (we will study that shortly). However, there are a few manufacturers around, such as Norma, Lapua and RWS, that still use the traditional process to make premium quality brass cases.


Manufacturing Cartridges in the 19th Century - Part II

$
0
0
In our last post, we studied how metallic centerfire cartridge cases were manufactured in large factories in the 19th century. We will continue our study of the manufacturing process in today's post.

Where we last left off, we'd just studied how the brass cases were shaped. The next step is to attach primers to the cases. In the 19th century, primers were made of copper caps. The process worked as follows:

The copper caps are made by punching blanks from copper sheets and then formed into small cups (similar to the cartridge cases in the previous post). A bunch of these caps are placed onto a plate with indentations in it to hold the caps in place. Then, this plate is covered by two other plates, which have holes drilled into them, corresponding to the positions of the caps, when all three plates are placed on the loading frame. The top plate can move horizontally for a short distance and when it is moved, the holes on this plate move clear of the holes in the middle plate, and thus it forms a bottom to the holes of the top plate. The shock-sensitive priming material is made damp with water and carefully spread over the top plate, so that it fills all the holes drilled into it. The surplus priming powder is brushed off. Then the top plate is moved back into position, where its holes correspond to the holes in the middle plate and the caps in the bottom plate. The priming material thus falls through the holes into the priming caps. The caps are then moved to a press and a tinfoil disk is pressed on to the priming powder and then varnished over with spirit varnish, to make the caps waterproof.

Manufacturing the priming powder and filling the caps were both considered as dangerous operations in the 19th century. Therefore, the British parliament passed a law that specified that only one person was allowed into the room where the priming powder was made and the room where the caps were filled. This law was to ensure that if there was an accident, there would be minimum casualties.

The caps are placed on the bases of the cartridge cases prepared in the previous post and then they are pushed into place by a descending rammer and are now ready to receive the propellant powder and the bullets.

In our next post, we will study how the bullets were made and the propellants loaded in the 19th century manufacturing process.

Manufacturing Cartridges in the 19th Century - Part III

$
0
0
In our last couple of posts, we studied how the cartridge cases and primers were manufactured during the middle of the 19th century. In today's post, we will study how the bullets for the cartridges were made. As before, we will study how the process was done at Kynoch, a large British manufacturer of ammunition, which was using the latest technologies and machinery available during that era.

While we have studied cast lead bullets in the past, by the 19th century, the casting method was considered too slow for mass production. Therefore, bullets were made in quantity using machinery. We will see how this was done in that era.

The first order of business was to prepare the lead for bullet making. Pure lead was not used for bullet manufacture as it is too soft. Instead, lead was melted and then, zinc or tin were mixed with the lead to harden it. This lead alloy was then forced out into long round ropes of metal, which were then coiled and loaded onto bullet-making machines.

The bullet-making machines at Kynoch were marvels of mechanical technology at that time. The best machines were capable of measuring out a length of metal, cutting it from the rope, feeding the cut piece into a die shaped like a conical bullet, forcing it in with a conoidal punch and then ejecting the finished bullet into a box. The bullets were then regulated in a press, to ensure that they were as cylindrical as possible. Each bullet was then placed in a lathe and wrapped with a paper patch, which was cut off and twisted while the bullet was revolving in the lathe. The paper patches were then waxed on to the bullet and the bullets were now ready to be loaded.

There were a few advantages of making bullets this way, versus the old casting process. For one, it was faster to manufacture bullets using this method. The bullets were also much more uniform in size, shape and weight than cast bullets. In addition to this, the possibility of casting defects, such as air pockets and hairline cracks, did not occur on these machine-made bullets.

The factory at Kynoch not only made lead bullets, but also made composite bullets (e.g.) jacketed bullets. To make these, the outer jacket was made of a copper alloy. The Kynoch factory used an alloy of 80% copper, 20% nickel, with small quantities of manganese, iron and silicon. This alloy was chosen because it is tough and hard and produces a shiny surface that doesn't tarnish easily. The alloy has a tensile strength of 27 tons per square inch. The alloy was rolled into sheets of 0.04 inches thickness. These sheets were then made into jackets using a process similar to how cartridge cases were made, which we studied earlier (i.e.) the round blanks are punched out from the sheet, then each blank is cut out and made into a cup and then passed to a drawing machine, where the jacket is drawn out gradually to the required length by multiple drawing operations. Unlike making the cartridge cases, annealing and pickling in acid were not necessary between each drawing stage and seven drawing operations were sufficient to elongate the blank into a outer jacket for a .303 bullet. The inner part of the bullets (the cores) were made of a lead alloy. Lead was mixed with 2% antimony and squirted into rods of the required diameter. These rods were cut into pieces of the length desired and each piece was placed into a jacket by hand. The composite bullet was then forced into a die, so that the edge of the jacket was turned down over the base. The final finishing processes consisted of adjusting the diameters of the bullet, trimming and adding the rings at the base.

It may interest the reader to know that some jacketed bullets are still made today, using a similar process. Here's a video showing how Hornady makes jacketed bullets today:


In the next post, we will study how the cases, primers and bullets were brought together to load a complete cartridge. Until then, happy viewing!
Viewing all 263 articles
Browse latest View live